Approval processes – Automation Tools-2
As a sales department manager, you have already contacted your system administrator, and with their help, you have created three approval processes:
- ≤ 30% discount: The opportunity is locked during the approval process. A request for discount approval is sent to senior sales, and you only receive a notification about the assignment of such a discount. After acceptance or rejection, the opportunity is unlocked.
- 30%–40% discount: The opportunity is locked during the approval process. A request for discount approval is sent directly to you. After acceptance or rejection, the opportunity is unlocked.
- 40% discount: The opportunity is locked during the approval process. A request for discount approval is sent to the chief revenue officer (CRO), and you receive a notification about the initiation of such an approval process. After acceptance or rejection, the opportunity is unlocked.
I think the next step in our IT journey will be to show you how to create such a process.
We will create it together step by step. But first, go to the Setup, and in the Quick Find box, find Chatter and click on the result. There, find Allow users to receive approval requests as posts and set it to True. It will permit you to add the Approval Post Template, which is an approval in the chatter (hell yeah!). Now, I will show you what the approval process creation form looks like. You can find fields such as Name, Email template, and Fields that will be used as conditions. It is shown in the following screenshot:
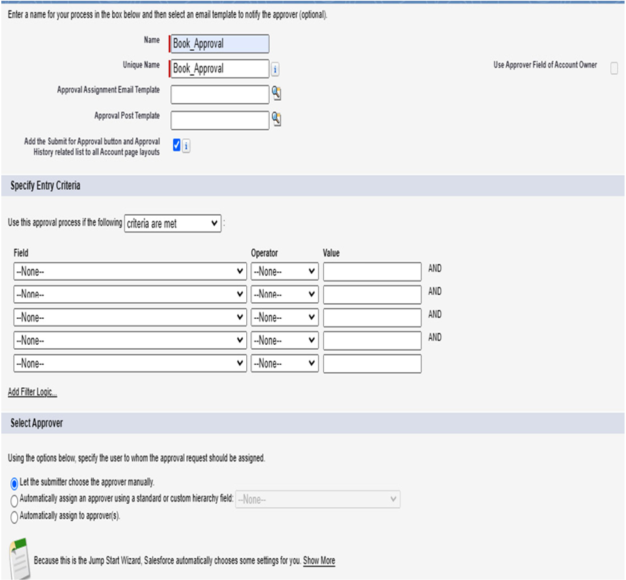
Figure 7.1: Approval process form
And now, a step-by-step manual.
- Open Setup.
I. In Quick Find, type Approval Process and click on the found item.
II. Select the object you intend to work on from the Manage Approval Processes For list.
III. After selecting, you will see a list of previously created approval processes divided into Active and Inactive. - The next step probably won’t surprise you; to create a new approval process, click on the button labeled Create New Approval Process.
I. Here we get two options: Use Jump Start Wizard and Use Standard Setup Wizard. These are two options for creating this process. Try both and see which one works better for you. I chose Use Jump Start Wizard.
II. A new page will open where you must enter the name of the approval process, and from this, a Unique name will also be created.
III. Then, you need to select an Approval Assignment Email Template, which will be the email template sent when an approval is assigned to a user. - Next is the Approval Post Template, which, like the email template, is optional. In this case, it will be a chatter post informing the user in the assigned process.